Saturday, 24 December 2016

Pansy boiler progress

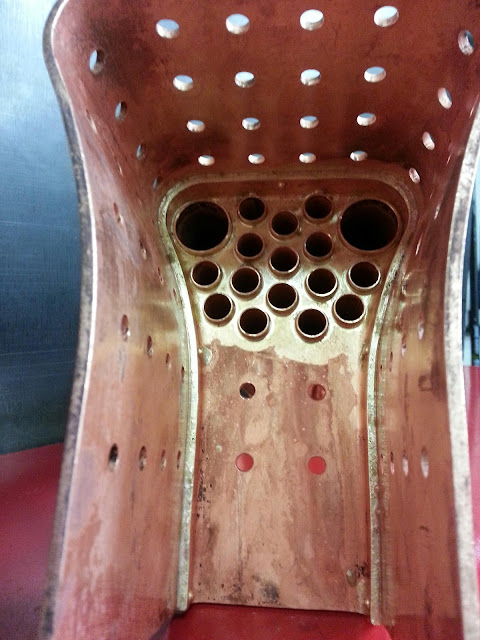
After the throatplate seams were cleaned up they were checked over for penetration. A good fillet on the inside satisfied me that it was all in good order and can now look at getting the dome onto the boiler barrel.

The dome flanges were machined from hollow gunmetal and drilled and tapped for the stainless capscrews. I can see the merit in studs but domes aren't regularly pulled apart so screws/bolts with good thread enegagement is sufficient and saves the work making studs and nuts.

The bottom flange has an o-ring recess which will have a Viton o-ring, to make easy resealing, no gaskets, no goo, and less torque required on the bolts to get the seal.  I once repaired a copper dome flange with stripped/pulled threads, required stepped studs and plenty of gasket goo with a gasket to seal it as it was warped from the tension required to get a seal!  Wrong material being too soft, not enough thread engagement, and very time consuming to get the gasket goo out from between the studs!

I've also been working on a jig to hold the barrel for setting up in the mill to do the dome flange hole. I'm expecting setting up the boiler in the mill to do the job means the dome flange is going to be square to the boiler from the getgo rather than mucking around with soldering jigs to square up a dome flange in an oversize hand-finished hole. The way copper tends to grab is good reason to get the clamping nice and solid.

Merry Christmas to you all and hope to catch you back again in 2017, let's make it a great year!

Don't forget you can subscribe to our blog to be emailed these updates as well!

Happy steaming!

Nigel

www.npwoolley.com

Thursday, 22 December 2016

Pansy boiler progress

Some more work on the Pansy boiler construction, barrel/throatplate/firebox seams underway. First they were set up to be drilled and riveted, given a super-clean, fluxed, and then riveted.

After that was done, the boiler stood up on end and surrounded with firebricks to conserve heat.

Then a good preheat done with the LPG and slowly worked around the seams with the oxy and silver solder. The capillary action of the solder brought a good show on the inside of the seams, with a couple of areas around the outer firebox to touch up from the inside. The areas to add a little more were marked close by on the copper with some chalk.

Below pictures show both set ups.

Happy steaming!

www.npwoolley.com

Tuesday, 20 December 2016

Boiler nearing completion

Not much more work to go on Princess Marina's boiler to finish off. Just the regulator and longitudinal stays and the firedoor hinge to complete the boiler, ready for a hydro test.

Over the last few days it has been non-stop working through the weekend to get the foundation ring in, stays done and the firebox door plate and firehole ring ready for fitting the backhead.  The boiler inspector checked it on Sunday and gave the nod to finish it off so yesterday and today was spent soldering up the backhead and wall stays and tackling the regulator.  This warm weather is making it a hot job!

Next boiler to complete in the new year will be a 5" gauge Pansy boiler.

We hope you have a Merry Christmas and a Happy New Year!

Cheerio!

www.npwoolley.com

Friday, 16 December 2016

Princess Marina boiler progress

A quick snap today of the crown stays going in a 3-1/2" Princess Marina boiler.  All those firebricks help conserve the heat.  Quite a lot of radiance off the copper as well.

I have two torches, LPG for general preheat and oxy/acetylene for local work.

Happy steaming!

www.npwoolley.com


Thursday, 15 December 2016

Tram progress

Boiler work underway this week, but not much to show off yet.

It's been a little while since last working on the Tram, but the running gear is coming together now. Evenings are just as busy as the days!

The sprockets I was after aren't available so I am in the process of making my own. Basically a hub and laser cut teeth.

There's always something to learn, the sprocket teeth being laser cut still needed a fair clean up with a file. The profile of the teeth was correct on the CAD file but the laser cut still made it too tight for the chain to fit on properly, so out came the chainsaw file for some cleanups. Something was amiss between the transition of radii on the root to tooth, the laser cut put a little step where they transition.  All that added up to 200+ teeth to fettle!

Chainsaw files are excellent, I use them all the time. I'm not sure of they are made from different steel but they do brilliant work to castings and any other tough skinned surfaces without losing an edge.

Happy steaming!

www.npwoolley.com

Saturday, 10 December 2016

More boiler photos

A bit more work on the Pansy boiler construction today...firebox and tube nest silver soldered up ready for the next steps. Barrel and butt strap done as well, will be joined to the throatplate and outer firebox shortly.

Happy steaming and have a nice weekend!


VR N class (steam) drawing list

I've compiled a list of the Victorian Railways N class drawings I have available, and you can dowload it on Modeller's Hub  <- click link to go to page.

Happy steaming!

www.npwoolley.com

Wednesday, 7 December 2016

VR I & GY 4 wheel wagon underframes

After searching through the various Victorian Railways rollingstock drawings, I've finished a couple of 1-1/8" scale "interface" drawings for the I & GY 4 wheel wagons, showing wheels, axles, and underframe dimensions. 

These drawings provide fixed dimensions of the track and wheels, sole bar spacing, and buffer centres.  Using my drawings together with the railway drawings will give a big benefit to the modeller, as you can work straight off the railway drawings and photos for details specific to your model.

These will soon be available as separate drawings for purchase.

Happy steaming!

www.npwoolley.com

Monday, 5 December 2016

Model Engineering philosophy

The two words "model" and "engineering" coming together in model engineering certainly makes for interesting discussion!

The philosophy that we take to build a working miniature entirely governs how long we take, where the detail is required, and the ultimate intended outcome. Thinking backwards from the intended outcome all the way back to the design is crucial, as it will form the rules how to  miniaturise the real thing.

For instance, the givens for most of our model locos is that we expect them to run on a club track, but this requirement brings about some key changes to the model that we can't always scale down.

The width of the wheels and flanges  needs focus, and thoughtful consideration given to what the loco is expected to do and look like.  These wheels must be suited to the track, and a key relationship to understand here (not often discussed) is overhang of the wheel over the rail for 100% contact on curves, out of gauge track, and oil slinging. If the wheel face is shy of or over the rail head, particularly on steam engines, the oil on the wheel from oiling the axleboxes and the side rods will be slung off, greasing up the rail...we've all been to the club runs where second day in, the track is like a skating rink thanks to a few greasing locos!

Another thing to consider regarding wheel width is the flange. Leading flanges especially on 8 coupled driving wheels do suffer significant wear on cornering, and hence why we have a wider AALS flange. This also happens on full size, I can describe a few full size 8 coupled locomotives with lubrication on the leading flanges to try counterract this.

For 5" gauge, combining the width of AALS flange and width of tread to overhang a 10mm flat bar rail on a curve would make a wheel approximately 18mm wide. The full size wheel in 5" gauge would scale from 5-1/2" wide down to 12-13mm. Using a fine scale wheel of 9/16 (14mm) would work and look prototypical with an 8mm flat bar rail, but the fine scale flange has 1/16" less material than the AALS flange.

The wheel width can have a reducing effect to the scale spacing of the frames. This comes into consideration when a smokebox or firebox has to fit between the frames. Not many impacts to a bar frame wide firebox loco.

The second impact of wider wheels is the possible reduction of bearing width on the rods, and tighter clearances of rods and crank pins behind crossheads.

A way to overcome these problems is to consider increasing the scale of the loco. I am one for boosting the scale factor slightly, which I hope to discuss more in future.

So there are some things to consider when building a dream loco, what are the main requirements, and how to get a philosophy to help make life easier building the model. It's always good to know what the implications are of making some key choices.

Happy steaming!

www.npwoolley.com

Saturday, 3 December 2016

Victorian Railways H class drawings

I have just received back some drawings that I got scanned in for a 3 cylinder VR H class (Heavy Harry).  The loco GA, tender tank, and underframe  All quite clean drawings.  Would certainly make a large and impressive model! 

If you're interested in what drawings are here for the H or can assist to swap to build this collection that would be fantastic!  Would love to hear from you!

www.npwoolley.com


Thursday, 1 December 2016

Girder stays for the Pansy boiler

A couple of girder stays were made for the Pansy boiler instead of the traditional longitudinal stays...the original design doesn't comply with our boiler code and there are some large areas on the backhead under-supported.

This also provides 100% support so the regulator is not in tension.

They are quite chunky!

www.npwoolley.com

Basic 3D with Draftsight

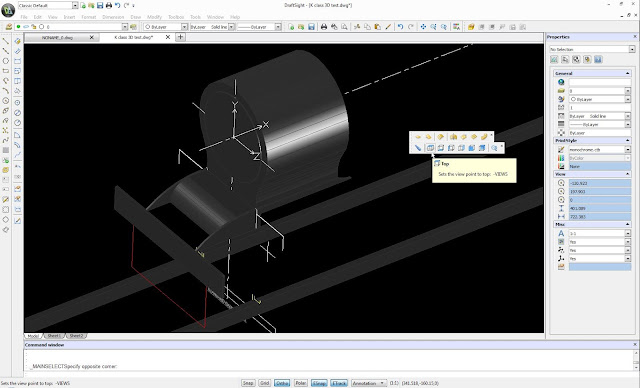
For the last few years I have been using Draftsight for 2D drawings, an excellent free program that functions just like AutoCAD LT.

Discovered somewhat by accident last night, I was surprised to see how the 3D side of Draftsight works.  It is very limited, no Boolean operations can be performed, no joining of parts, or drilling holes.  But it's there.

It will also do a functional rendering job, I didn't spend too much time playing with the lights but I'm sure a better render can be done when set up.

I had a quick go at a smokebox, it's not too bad!  Also I was able to import a 3D model which was done on AutoCAD.

Check out Draftsight, it's a professional level 2D program, an easy free tool to use for getting started on CAD.

www.npwoolley.com


Wednesday, 30 November 2016

An old style kero lantern

I'm building a Great Eastern style tram, based on the construction series in the Australian Model Engineer magazine with a few mods, and I needed to make the headlight.

The commercial torches these days mostly use those surface mount LEDs and the reflectors are not the right shape for an incandescent bulb. I came across a cheap torch at a junk store which still had a bulb and looked to be a suitable diameter.

I had a drawing of the kero lanterns the Victorian Railways used on the narrow gauge NA locos of Puffing Billy. This fortunately printed off in a scale I could work straight off the drawing...half the printed size.

The lantern body is made from bronze, machined out to house the reflector and bored right through so the bulb retainer comes out the back. The front wall of the tram was drilled out to clear the bulb retainer and facilitate wiring up The reflector is a push fit into the body of the lantern and so is easily removable.

The kero tank and the vent were made from solid, filed half round to suit the body, and machined to shape. The handles are from hardened piano wire with a bit of copper tube to represent the hinge. Mounting is via a tapped hole in the kero tank.

Maybe you could make a similar style lantern for your project!

Don't forget Christmas is coming up shortly, and those who purchase through the website will be in the draw to win some of our prizes!  See more about it on our website!


Tuesday, 29 November 2016

Pansy boiler trial fit

Some pics of how it's all coming together! Not long until the soldering starts.

Monday, 28 November 2016

A lathe spindle stop

I finally took the time to machine up a dead stop for the lathe spindle. Certainly makes for easy and consistent lengths when required.
A batch of boiler tubes seemed to be the ideal job to try it, so a bit of 50mm round bar was sourced and machined down to suit the thread in the rear end of the lathe spindle.
Thread cutting involved a bit of measuring and a bit of guesswork to get the plug to screw in, which is now a nice fit. The plug shoulder tightens up against the end of the spindle.
The end was machined from an offcut of bronze, and a 3/8" thread bar installed for setting the length. It will also fit inside the chuck for those short jobs.
Very easy to knock one up, worth making one if you have a few parts the same such as axles, boiler tubes, etc.

Capstan lathe rebuild

Currently in the final stages of rebuilding a Ward 2A capstan lathe for making production parts. It's a heavy brute of a machine. Very solid on the headstock too.
The strip-down involved pulling apart the gearboxes on the carriage and capstan feed, only to discover some serious rust had taken hold on the gears. So much so that quite a lot of teeth on the carriage feed gears were heavily pockmarked and much reduced in thickness and the capstan power feed wouldn't engage or disengage. Evidence of grease lubrication in some of it, I couldn't tell whether the greasing was done in the 1960s or 1970s. Quite historic!

The turret indexing mechanism didn't work either, and was missing a pinion gear that drives the stops. This was sourced from the UK from Ward Spares.

Many new parts have been made and the old ones given full treatment. The bed was oil-stoned to remove some dents and many hours spent on the wire wheel making it all look like new. The paint work seems to be original, I can't tell.

A 240v coolant pump was added, the well tank lid was modified and milled away to fit the new pump.

The spindle motor has been rewired to run off single phase through a VFD (variable frequency drive). This was wired up by a great friend and master electrician Jonathan McDonald. Took some time to decipher the Chinglish in the VFD manual!

Not long to go now, certainly a rewarding journey to strip and learn how it all goes together. The English machines are certainly made to last with a bit of TLC.

www.npwoolley.com

Boiler plates for a Pansy

Boiler plates coming along well for a 5" gauge Pansy. (Pansy is an 0-6-0 Great Western Pannier tank loco, building a new boiler to replace the under-spec old one)

The firebox flange was completed first, and then the reverse flange for the barrel.

www.npwoolley.com

NP Woolley news via a blog site

Hi all,

I have created a blog/news site at www.npwoolley.blogspot.com.au, it's not intended to be a separate source of information on what's happening but a "slave site" to generate a news feed that we can embed in our website.  Our website design program is not as customised for blogs and news feeds as we thought!  The main problems are text and image integration, getting overlaps on some devices!

Facebook's design had given us an easy place to put updates and job photos, but the problem with all these social sites is that they set up a separate source of information away from the website.  I'm not really happy with having a blogspot either as it has a separate URL, but the only other solutions seemed to be pushing on with our current clunky website manager or make some downloadable newsletters...ugh, I think that would be reverting back to the dark ages!

We're trying to download a copy of our old Facebook page, just for old time's sake.  It's not a bad resource either.  If we can, we'd like to get it up onto our website so you can go through it at your leisure.  Surprising how many people had visited our Facebook page, who weren't actually on Facebook!  I keep bumping into people who don't have an account and still looked at the page as a website.  We want to get that onto our website so there's ONE PLACE for all the information.


Lots of website improvements are underway, make sure to keep regularly visiting to not miss some of the new pages such as Modeller's Hub.  I have some more VR drawings to be scanned so keep an eye out!

Happy steaming,

Nigel

www.npwoolley.com

1-1/8" scale front ends - Some quick layout drawings


Modeller's Hub!


We're pretty excited to have a new page on our website called "Modeller's Hub".  We're in the process of listing up the railway drawings and information we have to make it available free of charge to help your project.  Many people have helped us for which we are extremely grateful, and we want to continue in the same way.  In the words of the Master, "Freely you have received, freely give".

There is a lot of work in generating drawing lists and indexes but have a look at what is available already on the Victorian Railways K and R classes.  Download the drawing list and if there are other drawings or locos of interest to you, by all means send us an email.

Help us help you
If you want to help us build a library of information to assist other modellers then we would love to hear from you.  Even if you have 1 drawing or some detail photos or site measurements of a prototype that you've taken, we would like to hear from you.  Send an email or use the contact form on this website to begin a conversation.

Click this link to visit MODELLER'S HUB

www.npwoolley.com

1-1/8" scale victorian railways models

I have always liked the steam locomotives of the Victorian Railways.

Commonly 1" scale is a close scale reproduction of Broad Gauge (5' 3") locomotives in 5" gauge, but a little bit of thought has gone into whether we can make these same locomotives a little bit more competatively sized in 5" gauge.  Some of the VR locos were designed for gauge conversion to Standard Gauge, being the designs from the 1920s and later.  The VR N class, R class, J class and so forth were designed with different techniques such as removing spacer blocks and machining frame stretchers to bring the cylinders and wheels in by 6-1/2".    The earlier designs were theoretically not "gauge convertable" but many wonderful things can be done to a model.

1-1/8" scale is popular for standard gauge models in 5" gauge, which gives an easy scale factor of 3/32" per inch full size.  The features and benefits of this scale is that the locos are a little bigger than "true scale" but improvements occur to the mechanicals and boiler with an increase in size, not to mention the added wieght with a cubic volume increase.  My personal philosophy is that we are trying to show the locomotive, and the slight size increase helps the loco look a bit more realistic on the ground level track, as the flat bar rail we use is quite over-scale anyway.

Some of the first parts have arrived and are being tested for fit.  So far the wheel patterns are underway, and we have some beautiful CNC machined buffers on the go as well. Some laser cut parts are here for the tenders, and work is progressing on the design.

The design for the K class will incorporate an improved regulator and superheater setup in the boiler, CNC machined parts, and a large selection of water cut and laser cut steelwork.  The prototype is a "Series 1" K class, whcih has the original flared tender and chimney, and no smoke deflectors.

You can read a bit more about the K class on Wikipedia  https://en.wikipedia.org/wiki/Victorian_Railways_K_class

www.npwoolley.com 

Off Facebook, whew!

Hi folks,

We've made a tough decision but we know it is for the best.  Facebook was instrumental in showcasing our work to our friends and making many new customers across Australia, and contacts in the UK.  In the last 4.5 years we have been able to broadcast worldwide some of the work that goes on here.

For a few reasons, we have closed our Facebook business pages (NP Woolley & Trainage), as we have narrowed it down to one point of contact here on our website, free from Google and Facebook ads.  That's what we pay our website host for!!

We've certainly been suprised at how many people have looked at our Facebook page through the internet (those who don't have a Facebook account).  No more need to do that, it's all going to be here!

We will be excited to add some newsworthy posts and updates, in the same flavour and easy reading style our fans liked on Facebook!

www.npwoolley.com

More 3/8" stainless steel superheater elements in stock!

We have another batch of stainless elements in stock.  This type is proving to be far superior to the standard copper superheater designs.  Many of our customers have cut off their existing copper superheaters and joined the stainless on, noticing a big difference in improved loco performance and longer service life.  The stainless stands up to the extreme heat of the fire, and also a harder metal to resist cinder erosion.

One of the improvements with the stainless type is the higher temperature of steam because the stainless superheaters can extend well over the firespace.  The steam gets much hotter and dryer in "radiant" superheaters than the common "convective" copper types.   There is more economical use of boiler steam & water and an improved performance at the cylinders.  Higher temperature steam gives more power before condensing.

Additionally, the return bends are neatly TIG welded, not constricting the gas path within the superheater flues, as compared to some designs of copper elements.  Some of the loco repairs we have done in the past has revealed the existing copper elements were hardly working at all, and the huge return bend blocks served no other purpose than to block off the flues!  In that case the boiler steaming capability was inhibited by having these elements fitted.   The stainless elements we supply will not constrict the boiler flues, and easy to fit a tube brush down the flues for cleaning.

How do you join the elements to the header? We recommend a liberally silver soldered joint as near as possible to the superheater header. Typically a 45% silver solder (with cadmium) is well suitable, just remove the outer oxide layer off the elements with emery.  We have also used the standard silver solder flux "Comweld, Silver brazing flux No. 2" with success. The trick is to not overheat the stainless, as the oxide layer will return, and you will have to clean it off and start over.  According to our silver solder manufacturer, the 45% CAD silver solder is formulated for joining stainless steel to copper, and doesn't waste away due to the dissimilar metals being joined.

Our superheaters are...

Seamless 316 grade stainless tube
Standard length (1m for 3/8", 600mm for 5/16"), you cut to suit your loco
TIG welded by pressure welding company
Purged with gas while welding (no weld slag inside tube)
Hydro tested to 200psi to confirm no leaks

If you would like to invest in the performance and long service life of your superheaters, why not give these elements a go in your loco.
Check out the "PRODUCTS" page of our website for pricing and details

www.npwoolley.com

A 1:1 scale loco project

After meeting some of the core team in Victoria, we are very pleased to offer services to the V499 new build steam locomotive project.  This engine is under construction by the Victorian Steam Locomotive Company.  The V class is significant to Victoria's railway history, as it was it's first class of 2-8-0 heavy freight locomotive. The engine is also unique in that it has the Baldwin patented Vauclain compound cylinders.  None of these locomotives have survived into preservation.

This is an exciting opportunity tor us to step it up a notch and assist a full-size new build steam loco project in Australia.  It requires ground-up design and drafting, working from Baldwin drawings and Victorian Railway archive documents.

If you haven't yet seen the VSLC's website, you can check out www.vicsteam.com